Laminate Hutch Makeover: Coffee Bar Transformation (Step-by-Step Tutorial)
When I saw this small hutch on Facebook Marketplace, I knew it could make such a cute coffee bar or display shelf.
And it was only $10!
Unfortunately, this piece of furniture isn’t solid wood, but for that price, who am I to complain? This laminate hutch makeover was a lot of work, but it was so worth it!
Here’s how I transformed this little beauty:


Supply List
Step 1: Fix Minor Damage
You don’t pick up a whole piece of furniture for $10 and expect it not to have a little bit of damage.
Despite the low price, this piece was in remarkably good shape, especially for laminate!
There was a chunk of laminate that was knocked loose, but was still hanging on. So, we put some glue up under the loose piece and then clamped it down until it dried.

Step 2: Add Support for Legs
I knew that I wanted to add legs to this hutch. There was wood on 3 sides of the furniture where we could screw in new legs. However, there wasn’t a piece of wood on the back that went down as far as the other sides. So, we added a piece.
Since we were painting it, we screwed the wood in from the side because we knew we could cover them up. We sunk the screws down in the wood so we could cover them with wood putty.


(We added this scrap piece of wood on the bottom of the hutch to screw the new legs into.)
Step 3: Scuff Sand
The next step of this laminate hutch makeover was scuff sanding.
Scuff sanding is when you lightly sand the surface. You’re not removing paint or stain, but you’re scuffing up the smooth surface to give the paint something to adhere to.
I usually do this with my orbital sander and a 120- or 220-grit sanding pad. The key is to keep the sander flat (not tilt it) and keep it moving. You don’t want to blow through the laminate and expose the particle board underneath.
Sand just enough that there is not longer a sheen to the ‘wood’.
However, if you do blow through the laminate, don’t worry! It’s not the end of the world and I’ll show you how to fix it.

Step 4: Wood Filler
When water sits on laminate furniture, the particle board beneath the laminate swells. This creates a bubbly appearance. And that is what happened to the counter height top of this hutch. (I imagine it was from repeatedly setting down a drink without a coaster.)
So, when I sanded this area, I did more than scuff sand it. I sanded it until there were no more bubbles and the surface was flat again. But, of course, this meant that I blew through the laminate and exposed the particle board underneath.

Since particle board is textured, and I want a smooth finish after painting, I covered the area with wood filler.
The easiest way to apply wood filler is with a putty knife or small scraper. Once it’s applied, let it dry for about an hour (depending on how thick you put it on) and then sand it smooth. I sanded this with a 120-grit paper and my orbital sander.
Then it’s ready for paint!


(I put wood filler in a couple of small areas where the laminate was damaged.)

Step 5: Add Painter’s Tape
For this laminate hutch makeover, there were several elements that I wanted to keep wood (or laminate). The doors, drawer, and shelves were all in really good shape, so I taped off the areas that I didn’t want to paint over.

Step 6: Prime & Paint
After you’ve sanded all the wood-filled areas and everything is nice and smooth, wipe down the whole hutch with a damp cloth. This will get rid of all the dust from sanding.
Then add your first coat of primer. I have used Zinsser Bulls Eye 1-2-3 Primer for years, and I don’t see that ever changing.
I rolled the primer on using a mini sponge roller. However, to get in the corners of the back of the shelf, I had to use a paint brush.
It took two coats of primer to get a good finish for paint.
I lightly hand-sanded between coats to make sure everything was smooth. After sanding, I wiped everything down with a damp rag before adding the second coat of primer

Once the primer is completely dry, it’s time to paint!
I used the same process for painting. One light coat, let it dry, then a light sanding, before wiping it down and adding the next coat of paint.
The paint I used for this project is Sherwin-Williams Cabinet & Furniture – Tricorn Black (satin). (It’s the same paint I used in this vintage nightstand makeover!)
It took 3 coats of paint to fully cover everything.


Step 7: Add Top Coat
I have been experimenting with top coats lately, trying to find something that is both scratch-resistant and easy to apply.
This time, I used Rustoleum 2X Ultra Cover Satin Spray Top Coat and I won’t be using it again.
Not only was it difficult apply, but even after drying for more than 24 hours, I left this scratch with my fingernail! When applying it, it was hard to get an even coat, it kept looking streaky. It took more than 2 cans to cover this small hutch.
In the end, I added a coat of my tried and true Minwax Polycrylic Water-Based Top Coat in a Satin finsh. It’s not a spray, so it’s a pain to apply, but it gives a beautiful finish and holds up well, even after years of use!

Step 8: Drill Hole
Since I thought this little hutch would make a perfect coffee bar, we needed to drill a hole in the back for any cords that need to be plugged in.
Using a 2″ hole saw on our cordless drill, my husband cut a 2-inch hole in the bottom corner of the top of the hutch. That way, if you put a coffee maker, lamp, or anything else that needs to be plugged in, you can run the cord behind the furniture.
It’s a simple thing to do and it makes things look much neater without cords sticking out the front or down the sides.

Step 9: Add Fabric
I knew I wanted to add a pop of color or fun pattern to this laminate hutch makeover. Usually, peel-and-stick wallpaper is the easiest way to do that. But I had leftover fabric from some wall art I made and decided to use it instead.
I measured the back of the hutch and cut my fabric 1/2-inch bigger than it needed to be. But this would give me a 1/4-inch ‘hem’ on each side.

Then I folded the sides of the fabric down 1/4-inch and glued the hem in place with fabric glue. Unfortunately, the fabric glue was NOT working for me. The ‘hem’ kept coming unfolded. So, I got out my hot glue gun and used it instead. It worked like a charm!
I also bought spray adhesive to attach the fabric to the back of the hutch, but since I already had my hot glue gun out, I figured why not use it?
With the top of the hutch laying down flat on the counter, I ran a line of hot glue across the top of the back of the hutch and put the fabric down in it. Then did the same thing for the sides and the bottom.
Make sure you do one side at a time so your hot glue doesn’t cool down and not stick.

Once the fabric was in, I had to cut the fabric over the hole. I cut an ‘X’ in the fabric over the hole using a sharp knife. Then I folded the fabric back through the hole and hot glued it on the back.
It’s not the most professional way, but it’ll hold!


Step 10: Add the Legs
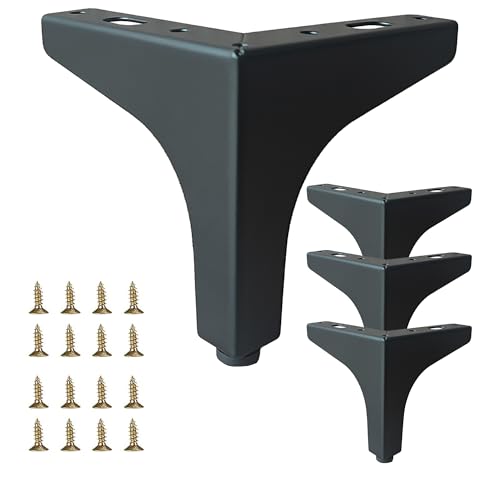
The hutch was finally coming together and it was time to add the legs. This was easy since we already had the supports in place.
All we had to do was screw the legs in using our drill and the screws that came with the legs I ordered from Amazon.
Step 11: Touch Ups
Since I didn’t do anything to the parts of the hutch that I was leaving ‘wood’, they needed a few minor touch-ups.
Using a Minwax Wood Finish Oil-Based Stain Marker in the color Dark Walnut, I touched up a few small knicks and scratches.
It was my first time ever using a stain marker, but I am impressed! I will definitely be using these again.


Step 12: Stage & Sell
And that’s it! The laminate hutch makeover was complete!
I staged it as a coffee bar and listed it on Facebook Marketplace and few other local sale pages. Initially, I got a few messages about it, but nothing worked out where the people actually showed up.


After 2 weeks of it not selling, I re-staged it as a display cabinet with books and trinkets. It took another week or so, but finally someone sent me a message and we delivered it to her in her new apartment!


I’m so happy with how this laminate hutch makeover turned out.
Laminate furniture isn’t ideal, but there’s so much of it available, especially second-hand. I’m glad we were able to save this one from the landfill and I hope the new owner uses it for years to come!